Page 1 of 2
New here
Posted: Sun Nov 01, 2015 7:57 pm
by flyingtodd47
Hello
I'm new here. I am the proud owner of plans #0183 I got them for my birthday, a special request to my wonderful wife.
I have built a Preceptor ultra pup and a Van's RV 9. Both kits, This will be my first scratch built.
I have never participated in a forum, so I have no idea how this works.
I am also a member of my local EAA, but because of my work schedule I have a hard time partcipating with them, lots of weekends and 12 hr. days.
I am going to try very hard to attend the next meeting.
I am hoping some one here can help me figure out what materials I'll need to build the ribs.
Thanks Todd
Re: New here
Posted: Mon Nov 02, 2015 8:29 am
by painless
Welcome Todd, and enjoy the build of your Hatz. I too am a repeat offender, having built an RV6A. That, however, was more assembly rather than building in comparison to the Hatz! It's really gratifying to see airplane parts made from plans. Fun stuff.
There are a bunch of helpful members on this forum, so don't hold back asking questions.
Re: New here
Posted: Mon Nov 02, 2015 8:46 am
by Bitshifter
Welcome Todd,
There are a lot of very knowledgeable craftsman here on the forum and with your existing kit building experience you will fit right in.
For building ribs I started by going to the local office supply store and making copies of the full size rib plans.
I cut the rib plans and glued them to pieces of plywood. I covered the plywood with a thin sheet of Acetate that I got a Lowes and then glued Lexan spacers to locate the spruce parts.
I ordered 1/4 x 1/4 spruce cap strip material from a local lumber yard and 1/16 mahogany plywood and T-88 epoxy from Aircraft Spruce. I forget how much cap strip material that I ordered but I got the number from just adding up everything on the prints and adding more.

The best clamps turned out to be cheap spring clamps from Harbor Freights, shown in the picture.
I also got a small scroll saw, table router and belt/disk sander from Harbor Freights along with a 9" band saw from Lowes. The table router and band saw are a must have tools but don't need to be fancy.
Welcome to the journey, I have been on it for three years now and look forward to doing a little each night.
Ed White
http://edwinwhite.com/hatz.html
Re: New here
Posted: Mon Nov 02, 2015 1:42 pm
by HC85
Hello Todd, welcome aboard!
Hmmm, looking back at my old Wick’s receipts I purchased 540 feet of 1/4x1/4 spruce for the cap strips. And I had some left over, which will, and has come/came in handy for other items during construction. My left over amount was not enough to scold myself for buying too much, so take it for what it’s worth.
To build the ribs I also bought a 4x4 sheet of 1/16, 3/16 and ¼ plywood from Wicks. I really like the wood I get from Wicks, and they are just two states over from me, causing helping delivery to be prompt.
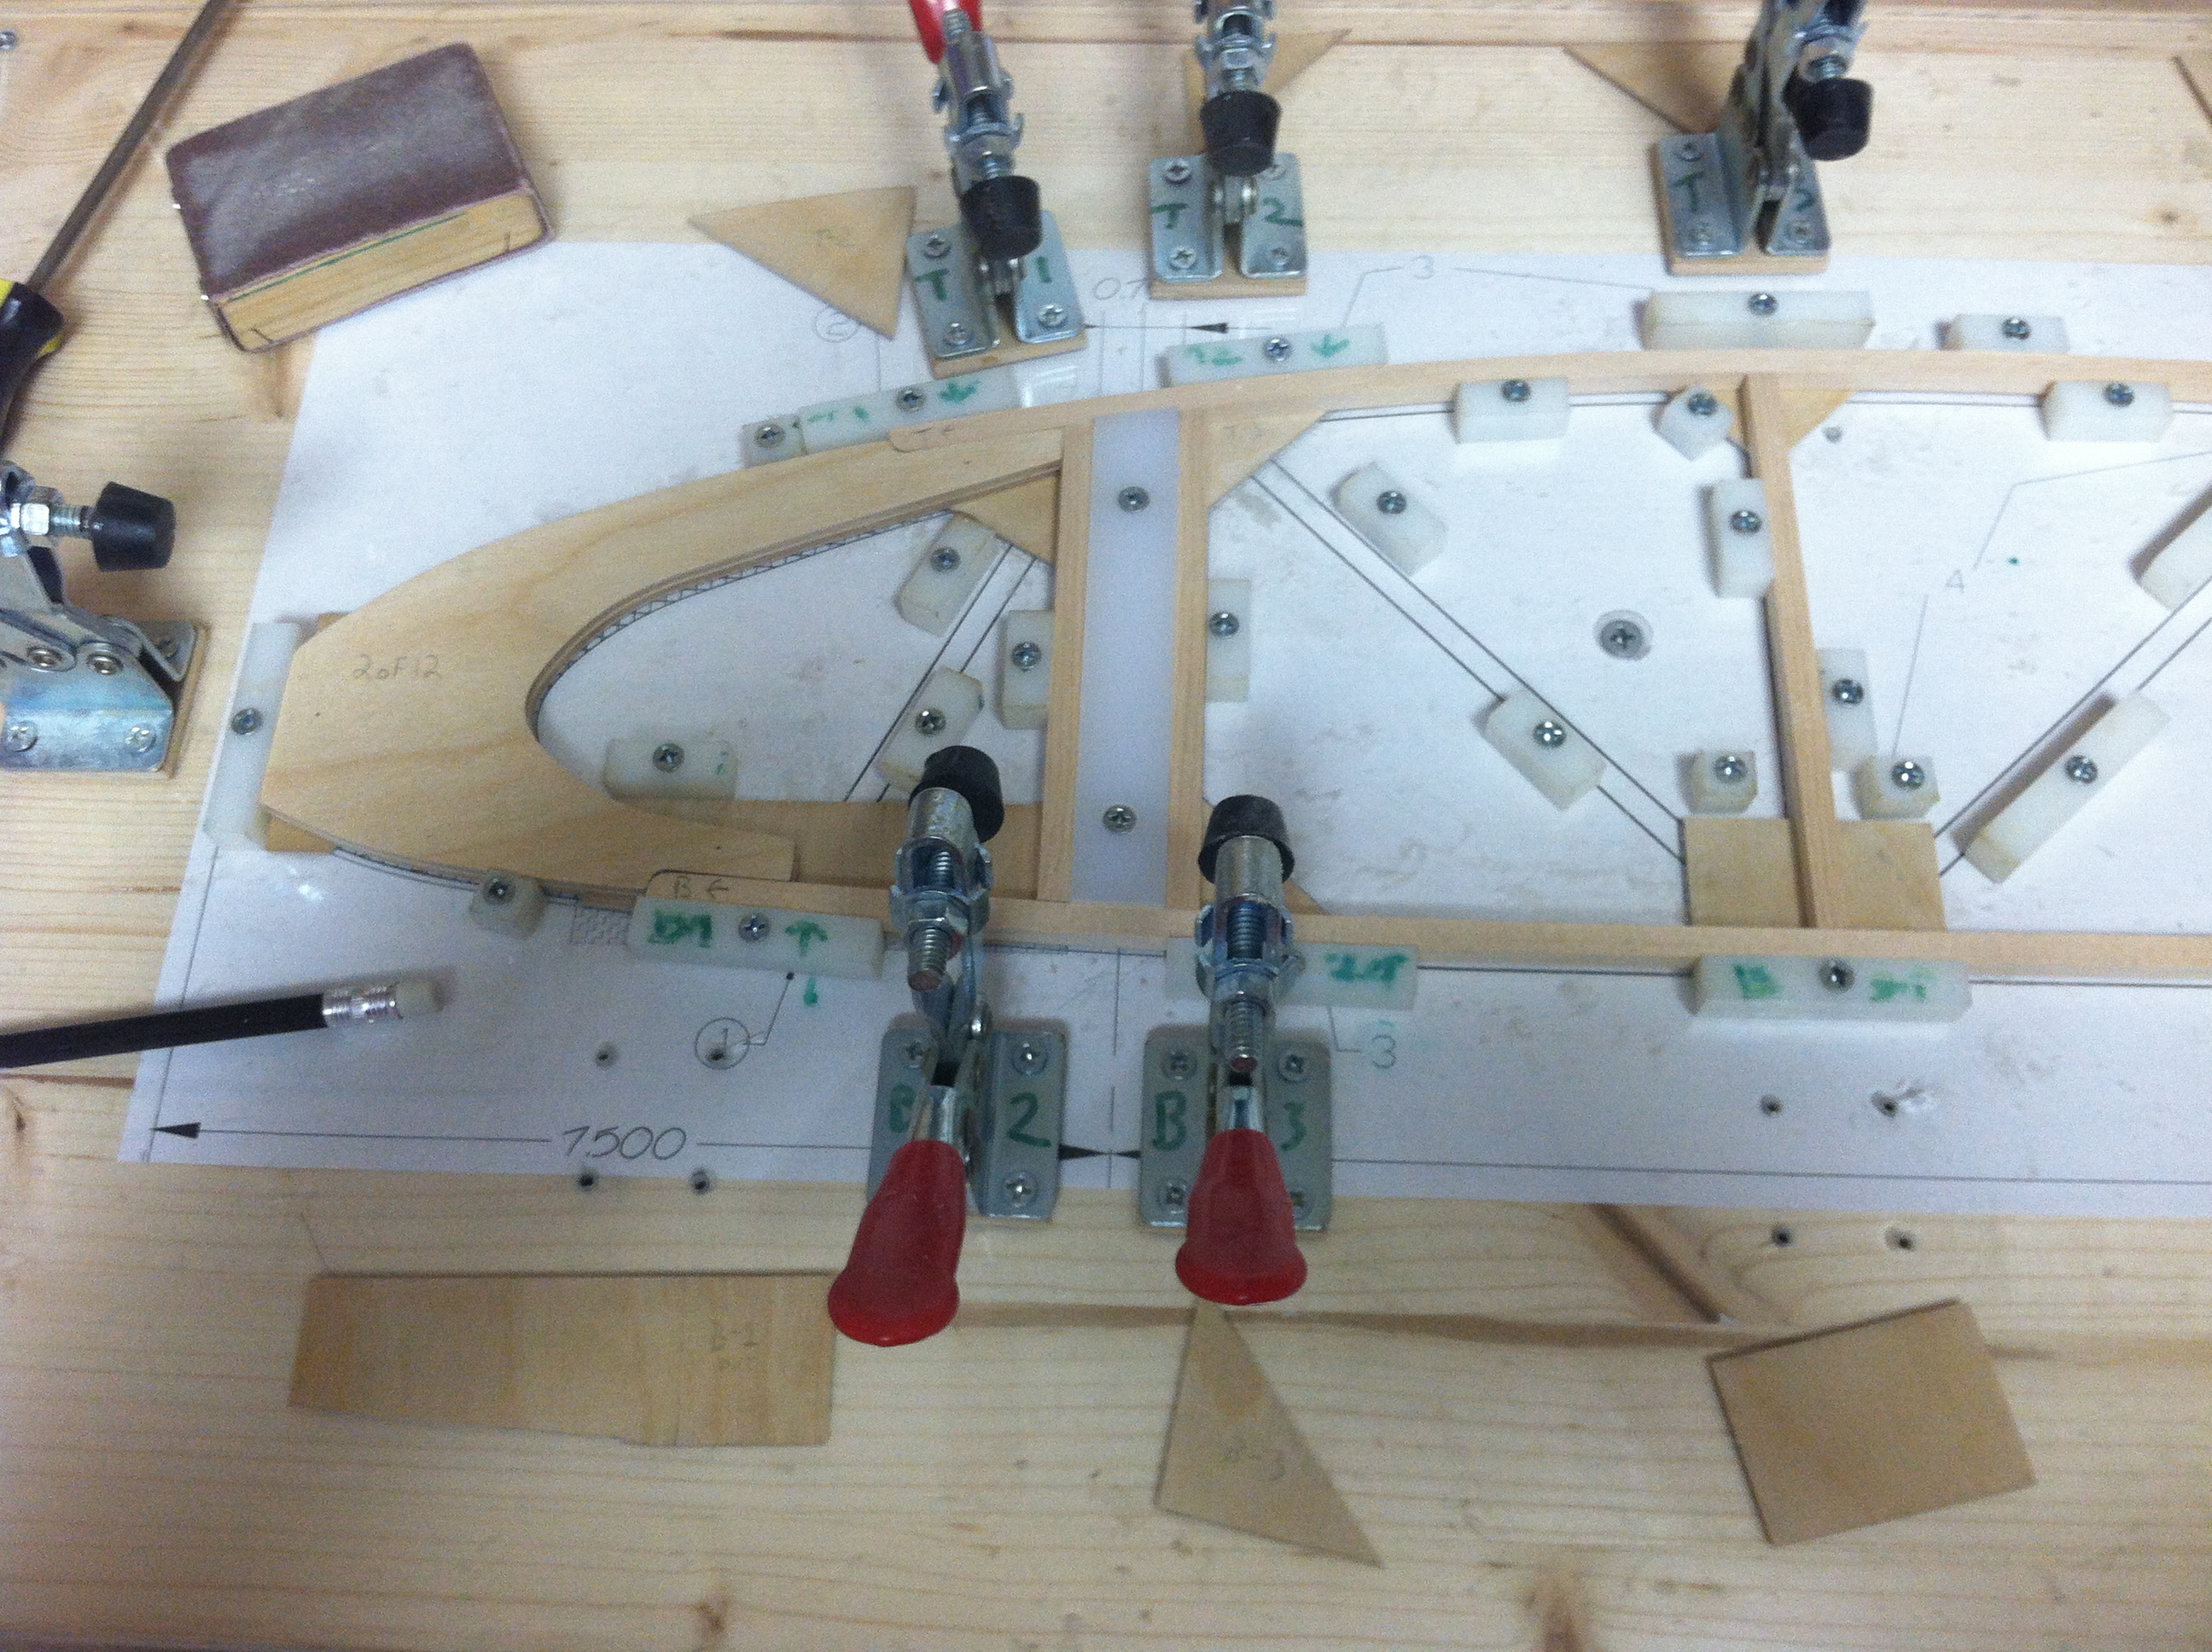
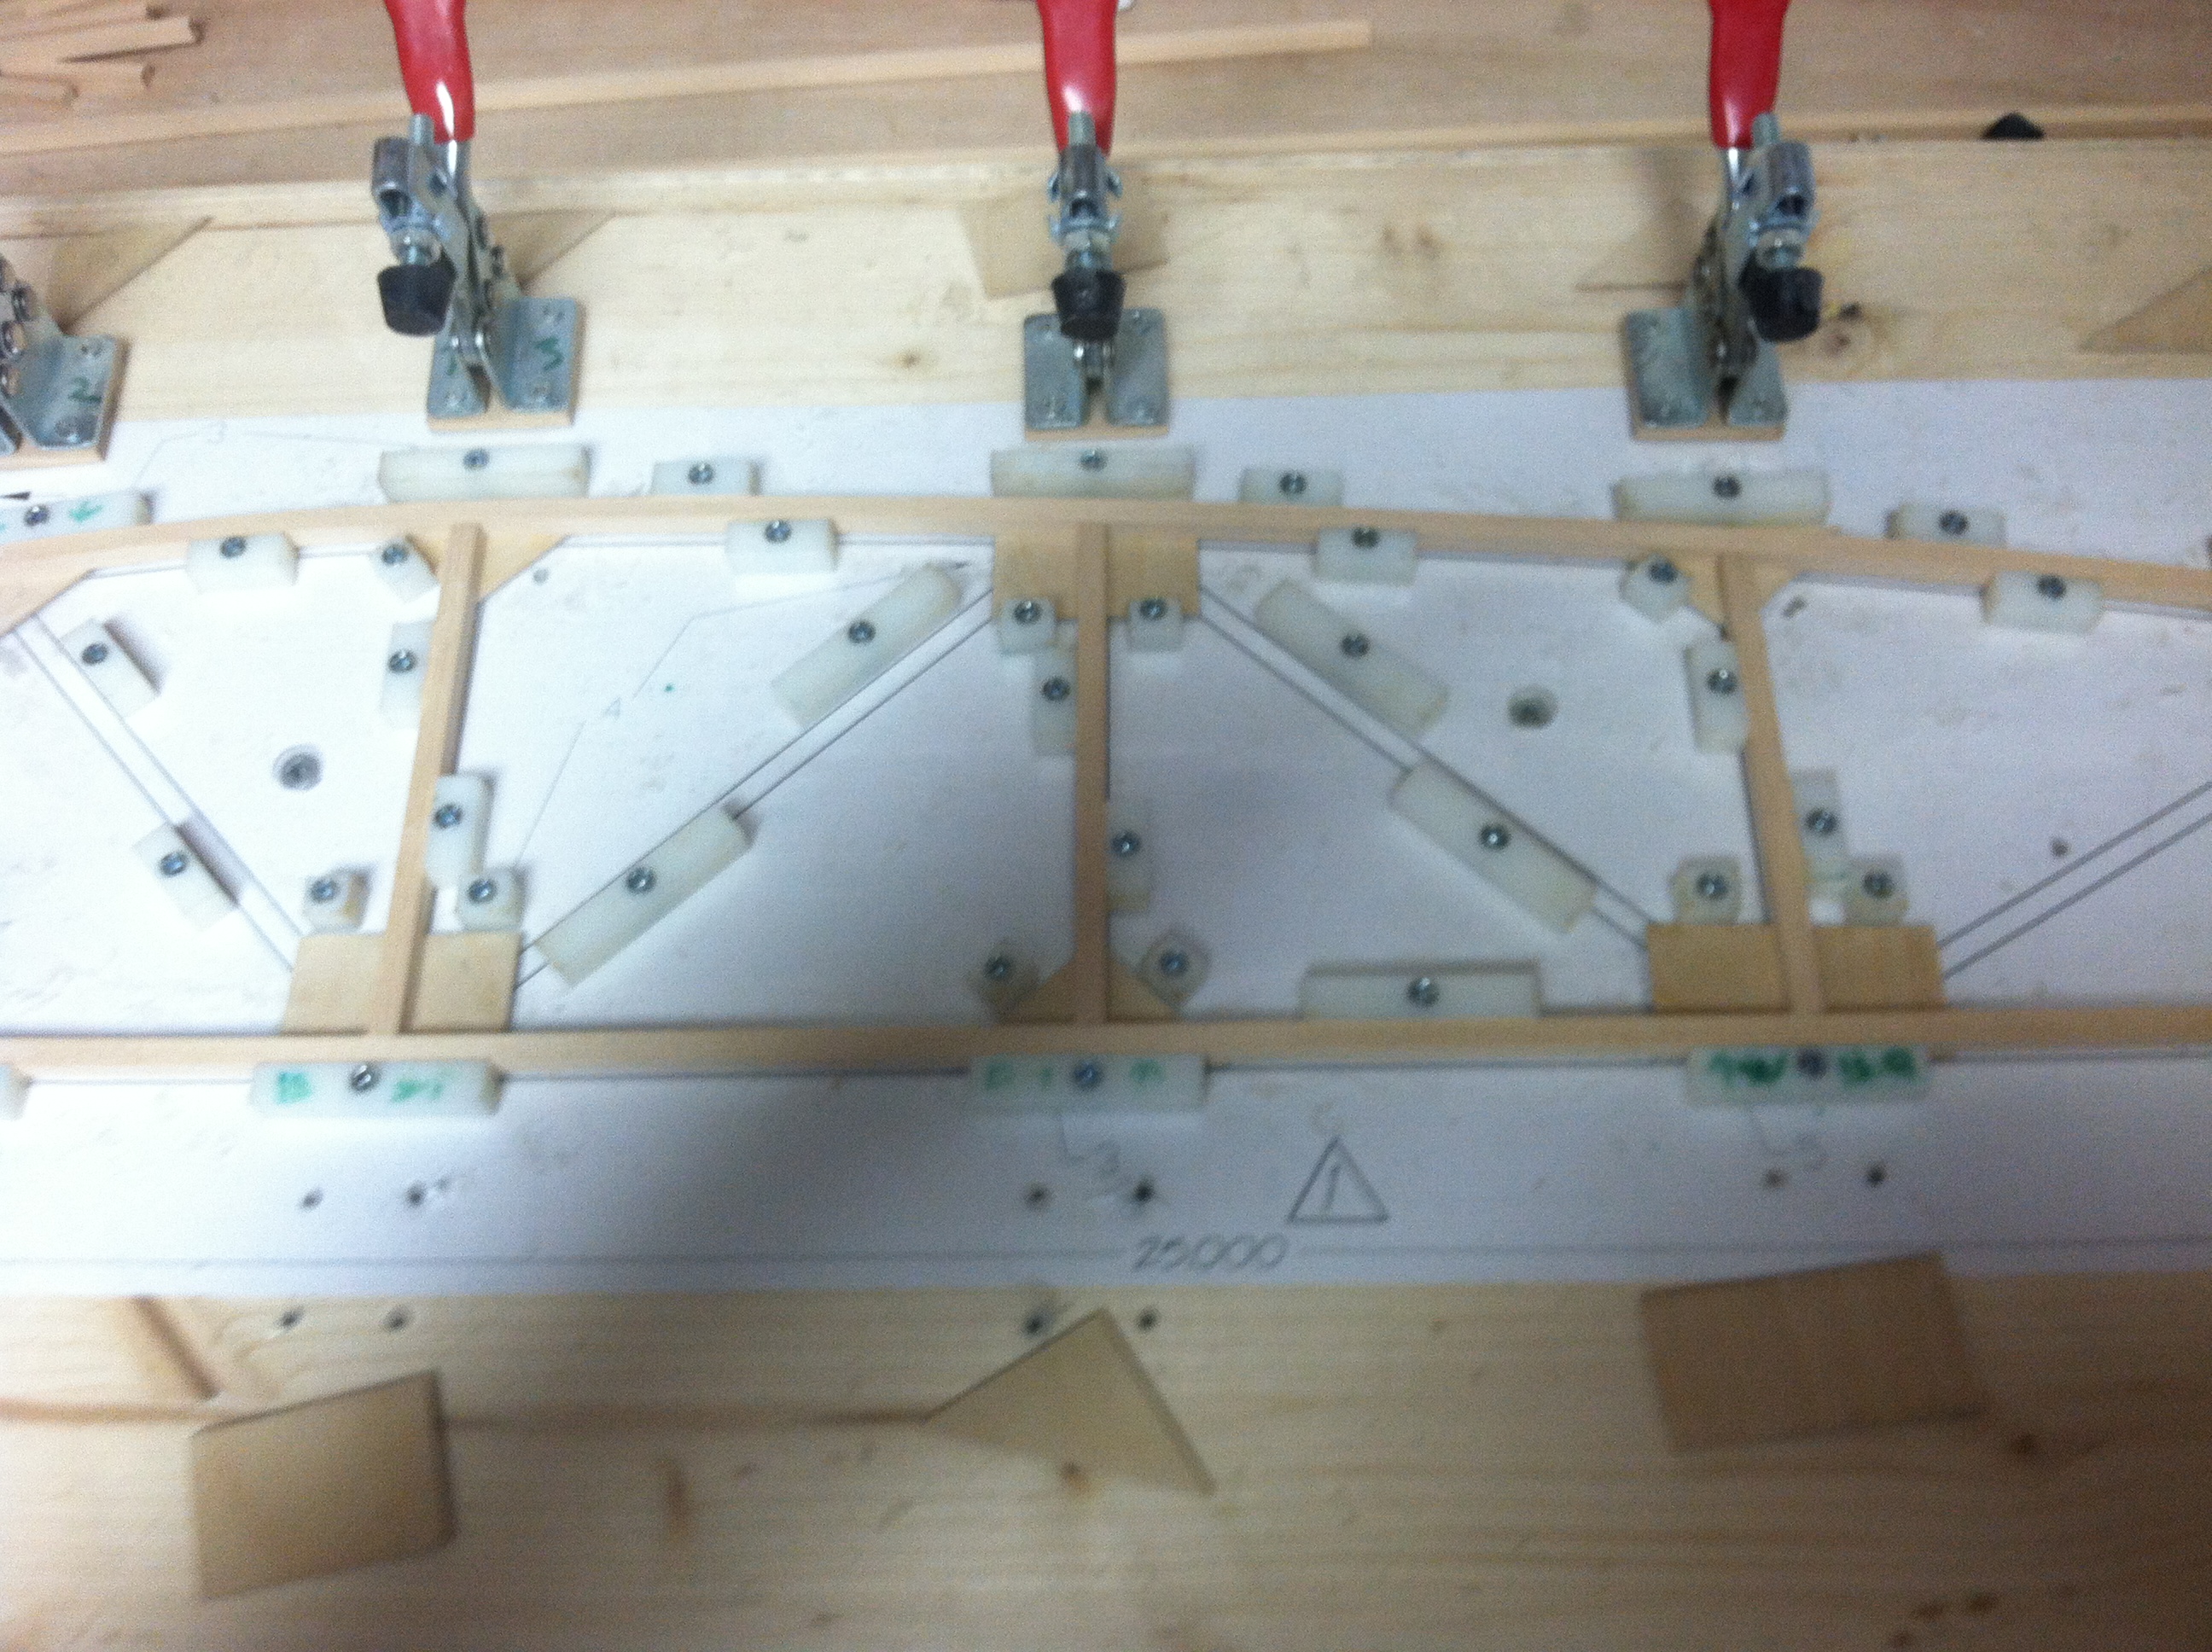
I made my rib jigs so I could glue the entire rib in one setting. I used toggle clamps on top of a board with Plexiglas over the board, and I used nylon blocks for the spar blank areas and for the outline of the capstrips. Beware, your plans may not have the correct spar center to center dimension, so you may have to either plot a new rib section, or what I did was to “modify” the print to work, by making a copy and cutting and pasting etc. That worked out fine. If you choose to use your prints and they do not have the correct center to center dimension ( I think it was 24 or 25 in, help me out here guys) Just make sure the center section spar center to center dimension is the same, so the outer panels will hook up to the center section correctly.
I bought the toggle clamps on-line cheaper than any place I found local. I think it was the toggle clamp store or something like that. I have them in a bag and I don’t think I will be needing them right away, so if you decide to go that route, I can let you borrow them, no problem. Just give me a shout.
I am going to try and attach photos of my rib jigs for you. They worked great. No flipping over to glue on the opposite side gussets. Do it all at once, no nails staples etc. This site is a treasure of information! You have a ton of experience I am sure we will all benefit from. Again, welcome!

- Jig View1
- 002.JPG (1.98 MiB) Viewed 5447 times

- Jig View 2
- 003.JPG (1.83 MiB) Viewed 5447 times
Re: New here
Posted: Mon Nov 02, 2015 5:13 pm
by flyingtodd47
painless wrote:Welcome Todd, and enjoy the build of your Hatz. I too am a repeat offender, having built an RV6A. That, however, was more assembly rather than building in comparison to the Hatz! It's really gratifying to see airplane parts made from plans. Fun stuff.
There are a bunch of helpful members on this forum, so don't hold back asking questions.
Hello Painless
I really appreciate your response, I already had your website on my favorites.
I hope I am using this reply correctly.
Flyingtodd47
Re: New here
Posted: Mon Nov 02, 2015 5:20 pm
by flyingtodd47
Bitshifter wrote:Welcome Todd,
There are a lot of very knowledgeable craftsman here on the forum and with your existing kit building experience you will fit right in.
For building ribs I started by going to the local office supply store and making copies of the full size rib plans.
I cut the rib plans and glued them to pieces of plywood. I covered the plywood with a thin sheet of Acetate that I got a Lowes and then glued Lexan spacers to locate the spruce parts.
I ordered 1/4 x 1/4 spruce cap strip material from a local lumber yard and 1/16 mahogany plywood and T-88 epoxy from Aircraft Spruce. I forget how much cap strip material that I ordered but I got the number from just adding up everything on the prints and adding more.

The best clamps turned out to be cheap spring clamps from Harbor Freights, shown in the picture.
I also got a small scroll saw, table router and belt/disk sander from Harbor Freights along with a 9" band saw from Lowes. The table router and band saw are a must have tools but don't need to be fancy.
Welcome to the journey, I have been on it for three years now and look forward to doing a little each night.
Ed White
http://edwinwhite.com/hatz.html
Thank you Ed. I can see your website will be very helpful.
Todd
Re: New here
Posted: Mon Nov 02, 2015 5:26 pm
by flyingtodd47
HC85 wrote:Hello Todd, welcome aboard!
Hmmm, looking back at my old Wick’s receipts I purchased 540 feet of 1/4x1/4 spruce for the cap strips. And I had some left over, which will, and has come/came in handy for other items during construction. My left over amount was not enough to scold myself for buying too much, so take it for what it’s worth.
To build the ribs I also bought a 4x4 sheet of 1/16, 3/16 and ¼ plywood from Wicks. I really like the wood I get from Wicks, and they are just two states over from me, causing helping delivery to be prompt.
I made my rib jigs so I could glue the entire rib in one setting. I used toggle clamps on top of a board with Plexiglas over the board, and I used nylon blocks for the spar blank areas and for the outline of the capstrips. Beware, your plans may not have the correct spar center to center dimension, so you may have to either plot a new rib section, or what I did was to “modify” the print to work, by making a copy and cutting and pasting etc. That worked out fine. If you choose to use your prints and they do not have the correct center to center dimension ( I think it was 24 or 25 in, help me out here guys) Just make sure the center section spar center to center dimension is the same, so the outer panels will hook up to the center section correctly.
I bought the toggle clamps on-line cheaper than any place I found local. I think it was the toggle clamp store or something like that. I have them in a bag and I don’t think I will be needing them right away, so if you decide to go that route, I can let you borrow them, no problem. Just give me a shout.
I am going to try and attach photos of my rib jigs for you. They worked great. No flipping over to glue on the opposite side gussets. Do it all at once, no nails staples etc. This site is a treasure of information! You have a ton of experience I am sure we will all benefit from. Again, welcome!
002.JPG
003.JPG
Thank you HC85 I've already learned some useful stuff. Your rib jig is cool I hope to build mine very soon.
I saw on the plans "25" and that's what mine measures.
Flyingtodd47
Re: New here
Posted: Mon Nov 02, 2015 9:02 pm
by dougm
Welcome aboard Todd. There are a lot of great folks here on the forum who are more than willing to help out.
Put Brodhead on your calendar next July and come meet them in person and see some finished Hatzs.
Re: New here
Posted: Tue Nov 03, 2015 9:36 am
by tlandrum
Welcome!
I am a first time builder, and decided to jump right into plans built... but I may be a little crazy.
My recommendations would be to look on the webpages so many people have built (mine is a Facebook page). There is a wealth of knowledge there. There are about as many different ways to build your rib jigs as there are builders. Spend a lot of time looking through all the different ones and see which one fits your personality. There are good and bad points to all of them. I would certainly start with the jigs before you ever even buy any wood. I did order some 4" long pieces of spar and cap strap from wicks, as well as a 1/4" piece of homedepot wood (a square dowel rod) just to help me with sizing of things. Making the jigs took me a few months to get just right (as I recall about 50 hours of build time). So you have plenty of work to do before you ever need anything from Wicks or Aircraft Spruce. (everything that does not go on the finished airplane, the plywood, Plexiglas, and screws for the jig etc, can come from your local hardware store just fine.)
But look at different peoples webpages, and you will learn a ton. Then ask questions... trust me there are no dumb questions (I would know, as a first time builder with no builders within a few hundred miles I push that "dumb question" notion on a regular basis!)
Good luck, have fun, and welcome to the club!
Re: New here
Posted: Wed Nov 04, 2015 8:37 pm
by flyingtodd47
Thanks for your encouragement and suggestions.
Todd
